

初めまして。エンタプライズ第一本部の佐藤です。
前回はMCPサーバーの立ち上げ方の記事を作成しましたが、今回はこのサーバーに接続するClientを用いて接続側の実装をするという試みです。
前回記事はこちら
【初心者向け】2年目エンジニアが実践したMCPサーバー構築ガイド2025
既出の内容かつ不正確な部分もあるかもしれませんが、私の個人的な検証記録として残しておきたいという目的でこの記事を作成します。
最近MCPサーバーが盛り上がってますが、サーバーへ接続する方法も知りたかったので本記事を作成します。
前回の記事では以下の図の赤枠の部分を実装しました。
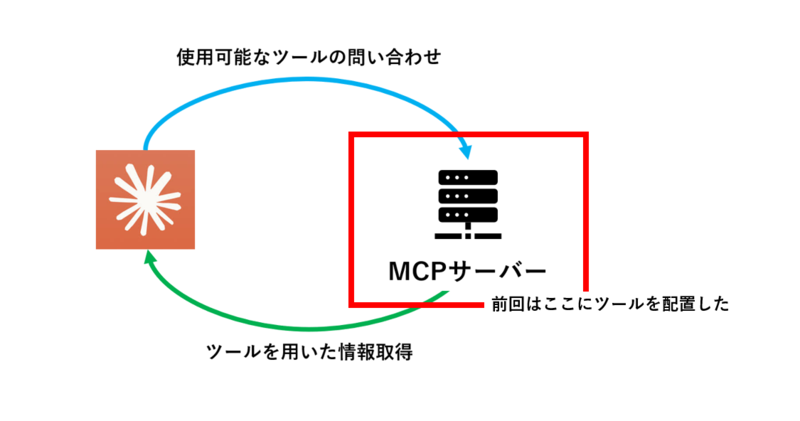
上側の水色の矢印部分にあたるツール呼び出し部はClaudeDesktopに内包されていたので、前回はこの部分のロジックを意識せずにツールを実行できるかという部分を検証していました。
さて、ClaudeDesktopから呼び出せるのも良いのですが、通信規格を統一したというところの良さを実感しつつ、なぜツールが選択できているのかを詳しく見ていきます。
では、例のごとくMCP QuickStartのFor Client Developersを参考にClientの実装を行いましょう。
まずは環境構築です。
上から順に、
作業ディレクトリの作成
仮想環境を有効化
仮想環境に必要な依存関係を追加
main.pyを削除(client.pyで作業するため)
client.pyを作成
という操作をしています。
client.pyが今回、コードを作成する部分です。
# Create project directory
uv init mcp-client
cd mcp-client

# Create virtual environment
uv venv

# Activate virtual environment
# On Windows:
.venv\Scripts\activate
# On Unix or MacOS:
source .venv/bin/activate

# Install required packages
uv add mcp anthropic python-dotenv

# Remove boilerplate files
rm main.py

# Create our main file
touch client.py
次はAnthropicのAPIキーを取得して.envファイルに書いておきます。
ファイルの作成
# Create .env file
touch .env
この.envファイルを編集して以下の記述を追加。
your key hereの部分はAPIキーを記載します。
APIキーの取得方法はこちらで、APIのページに遷移して、StartBuildingを押下し、GetAPIkeysを選択します。
Create Keyを選択して、任意の名前をつけてAddを押下。
次のポップアップでキーが出るのでコピーしてください。
【注意】このAPIキーは厳重に保管し、使用しなくなった場合は削除をしてください。流出すると思わぬ課金の原因になります。
ANTHROPIC_API_KEY=<your key here>
次に以下のコマンドで.gitignoreにこのファイルを追加します。
構成管理に含めないことでAPIキーがリモートレポジトリに保存されないようにします。
echo ".env" >> .gitignore
以上で環境構築は終了です。
次にclient.py内で作業を行っていきます。
import asyncio
from typing import Optional
from contextlib import AsyncExitStack

from mcp import ClientSession, StdioServerParameters
from mcp.client.stdio import stdio_client

from anthropic import Anthropic
from dotenv import load_dotenv

load_dotenv()  # load environment variables from .env

class MCPClient:
    def __init__(self):
        # Initialize session and client objects
        self.session: Optional[ClientSession] = None
        self.exit_stack = AsyncExitStack()
        self.anthropic = Anthropic()

    async def connect_to_server(self, server_script_path: str):
        """Connect to an MCP server

        Args:
            server_script_path: Path to the server script (.py or .js)
        """
        is_python = server_script_path.endswith('.py')
        is_js = server_script_path.endswith('.js')
        if not (is_python or is_js):
            raise ValueError("Server script must be a .py or .js file")

        command = "python" if is_python else "node"
        server_params = StdioServerParameters(
            command=command,
            args=[server_script_path],
            env=None
        )

        stdio_transport = await self.exit_stack.enter_async_context(stdio_client(server_params))
        self.stdio, self.write = stdio_transport
        self.session = await self.exit_stack.enter_async_context(ClientSession(self.stdio, self.write))

        await self.session.initialize()

        # List available tools
        response = await self.session.list_tools()
        tools = response.tools
        print("\nConnected to server with tools:", [tool.name for tool in tools])
ここまでがサーバーとの接続を担う部分です。標準入出力を用いるようにしています。
    async def process_query(self, query: str) -> str:
        """Process a query using Claude and available tools"""
        messages = [
            {
                "role": "user",
                "content": query
            }
        ]

        response = await self.session.list_tools()
        available_tools = [{
            "name": tool.name,
            "description": tool.description,
            "input_schema": tool.inputSchema
        } for tool in response.tools]

        # Initial Claude API call
        response = self.anthropic.messages.create(
            model="claude-3-5-sonnet-20241022",
            max_tokens=1000,
            messages=messages,
            tools=available_tools
        )
ここまでで入力された質問に関する解析を行っています。
具体的には関数(ツール)の説明文と引数の型の情報をもつ使用可能なツールをLLMに渡しています。
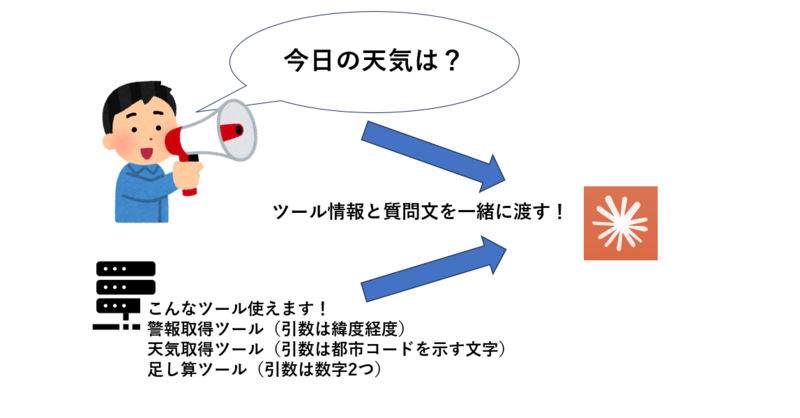
図のようなイメージでツール情報と質問文をLLMに投げちゃってます!
        # Process response and handle tool calls
        final_text = []

        assistant_message_content = []
        for content in response.content:
            if content.type == 'text':
                final_text.append(content.text)
                assistant_message_content.append(content)
            elif content.type == 'tool_use':
                tool_name = content.name
                tool_args = content.input

                # Execute tool call
                result = await self.session.call_tool(tool_name, tool_args)
                final_text.append(f"[Calling tool {tool_name} with args {tool_args}]")
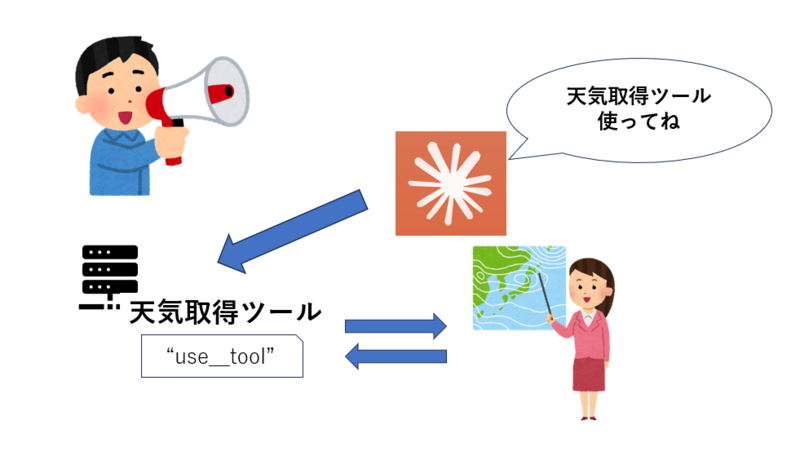
この部分でさっき使えるツール情報と質問文を投げた結果を用いています。
イメージは以下の図で天気の質問なら、天気取得ツールを使った方が良いですねとなっているということです。
ここでresultに使用すべきツールとして”use_tool”フラグがついた関数を呼び出した結果を格納し、LLMに渡すメッセージの一部として格納しています。
                assistant_message_content.append(content)
                messages.append({
                    "role": "assistant",
                    "content": assistant_message_content
                })
                messages.append({
                    "role": "user",
                    "content": [
                        {
                            "type": "tool_result",
                            "tool_use_id": content.id,
                            "content": result.content
                        }
                    ]
                })

                # Get next response from Claude
                response = self.anthropic.messages.create(
                    model="claude-3-5-sonnet-20241022",
                    max_tokens=1000,
                    messages=messages,
                    tools=available_tools
                )

                final_text.append(response.content[0].text)

        return "\n".join(final_text)
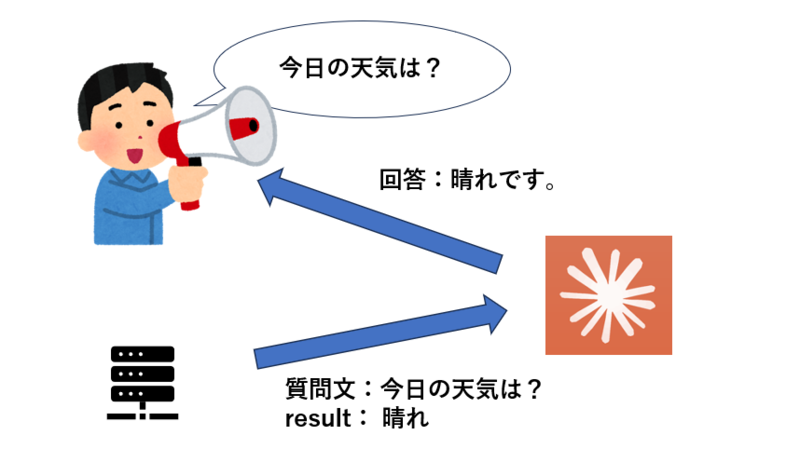
ここで最初の質問文である「今日の天気は?」と利用した天気取得ツールからのレスポンス「晴れ」を用いて、回答を出力します。
イメージは以下の図の通りです。
ここまでで、LLMへのリクエストは2回しています。
まとめると、1つのツールを呼びだすにはツールの判定、質問文と結果のセットで回答生成というプロセスを背後で行うということです。
    async def chat_loop(self):
        """Run an interactive chat loop"""
        print("\nMCP Client Started!")
        print("Type your queries or 'quit' to exit.")

        while True:
            try:
                query = input("\nQuery: ").strip()

                if query.lower() == 'quit':
                    break

                response = await self.process_query(query)
                print("\n" + response)

            except Exception as e:
                print(f"\nError: {str(e)}")

    async def cleanup(self):
        """Clean up resources"""
        await self.exit_stack.aclose()

async def main():
    if len(sys.argv) < 2:
        print("Usage: python client.py <path_to_server_script>")
        sys.exit(1)

    client = MCPClient()
    try:
        await client.connect_to_server(sys.argv[1])
        await client.chat_loop()
    finally:
        await client.cleanup()

if __name__ == "__main__":
    import sys
    asyncio.run(main())
最後に、先ほどの回答生成プロセスの実体であるprocess_query関数で回答を生成するようにしています。
これでサーバーを起動する側の準備が整いました。
前回の続きでサーバーを立てていればweather.pyが利用できるはずなので、こちらを指定してclient.pyでweather.pyを起動します。
#pathは自分の環境に設定してください
uv run client.py path/to/weather.py
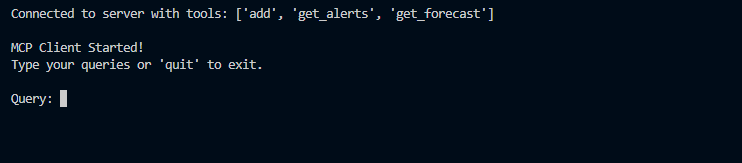
このコマンドを実行すると、以下のようにコンソールでLLMを使用でき、MCPサーバーにも接続できています。
実際に使用可能なツールとして、add、get_alerts、get_forecastの3つが表示されました。
Queryの後に「サクラメントの天気は?」のように適当な指示文を渡すと回答が生成されます。
この検証を応用してインタフェースを変えることもできそうですね!
以上で作業を終わります。
ここまで読んでくださり、ありがとうございました!
執筆:@sato.yu、レビュー:@nakamura.toshihiro
(Shodoで執筆されました)


